Stocker et récupérer des données
Sommaire
Afficher les infos d'une carte SD
Matériel
- Arduino Uno
- Adafruit Data Logging Shield
- Une carte SD formaté en fat32
Principe
Avant de pouvoir écrire ou lire une carte SD, il est nécessaire de s'assurer a minima que la carte fonctionne. Si vous voulez écrire et qu'elle est en lecture seule, vous allez au devant de gros problèmes.
Programme
Voici le programme qu'il faut éditer dans l'IDE Arduino, puis compiler et charger dans la carte Arduino.
/*
  Ce programme affiche toutes les informations concernant la carte SD ainsi que son mode READ/WRITE
*/
#include <SPI.h>
#include <SD.h>

Sd2Card card;
SdVolume volume;
SdFile root;

// Arduino Ethernet shield: pin 4
// Adafruit SD shields and modules: pin 10
// Sparkfun SD shield: pin 8
const int chipSelect = 4;

void setup()
{
 // Ouvre le port serie et attend au besoin...
  Serial.begin(9600);
   while (!Serial) {
    ; // wait for serial port to connect. Needed for Leonardo only
  }

  Serial.print("\nInitializing SD card...");
  pinMode(10, OUTPUT);

  if (!card.init(SPI_HALF_SPEED, chipSelect)) {
    Serial.println("initialization failed. Things to check:");
    Serial.println("* is a card is inserted?");
    Serial.println("* Is your wiring correct?");
    Serial.println("* did you change the chipSelect pin to match your shield or module?");
    return;
  } else {
   Serial.println("Wiring is correct and a card is present.");
  }

  // print the type of card
  Serial.print("\nCard type: ");
  switch(card.type()) {
    case SD_CARD_TYPE_SD1:
      Serial.println("SD1");
      break;
    case SD_CARD_TYPE_SD2:
      Serial.println("SD2");
      break;
    case SD_CARD_TYPE_SDHC:
      Serial.println("SDHC");
      break;
    default:
      Serial.println("Unknown");
  }

  // Maintenant on essaie d'ouvrir le volume en fat 16 ou 32
  if (!volume.init(card)) {
    Serial.println("Could not find FAT16/FAT32 partition.\nMake sure you've formatted the card");
    return;
  }

  // On affiche la taille de l'espace
  uint32_t volumesize;
  Serial.print("\nVolume type is FAT");
  Serial.println(volume.fatType(), DEC);
  Serial.println();

  volumesize = volume.blocksPerCluster();
  volumesize *= volume.clusterCount();
  volumesize *= 512;
  Serial.print("Volume size (bytes): ");
  Serial.println(volumesize);
  Serial.print("Volume size (Kbytes): ");
  volumesize /= 1024;
  Serial.println(volumesize);
  Serial.print("Volume size (Mbytes): ");
  volumesize /= 1024;
  Serial.println(volumesize);

  Serial.println("\nFichiers trouves sur la carte avec nom, date et taille en bytes: ");
  root.openRoot(volume);

  // Liste les fichiers de la carte avec date et taille
  root.ls(LS_R | LS_DATE | LS_SIZE);
}

void loop(void) {
  // rien à faire
}
Ecrire des données sur une carte SD
Matériel
- Arduino Uno
- Adafruit Data Logging Shield
- Une carte SD formaté en fat32
Principe
Le but est de montrer comment écrire dans un fichier.
Programme
Voici le programme qu'il faut éditer dans l'IDE Arduino, puis compiler et charger dans la carte Arduino.
/*
  Ce programme montre comment écrire sur une SD Carte
 * SD card attached to SPI bus as follows:
 ** MOSI - pin 11
 ** MISO - pin 12
 ** CLK - pin 13
 ** CS - pin 4

 */

#include <SD.h>
#include <SPI.h>

File myFile;
void setup()
{
 // Open serial communications and wait for port to open:
  Serial.begin(9600);
   while (!Serial) {
    ; // wait for serial port to connect. Needed for Leonardo only
  }

  Serial.print("Initializing SD card...");
  // On the Ethernet Shield, CS is pin 4. It's set as an output by default.
  // Note that even if it's not used as the CS pin, the hardware SS pin
  // (10 on most Arduino boards, 53 on the Mega) must be left as an output
  // or the SD library functions will not work.
   pinMode(10, OUTPUT);

  if (!SD.begin(4)) {
    Serial.println("initialization failed!");
    return;
  }
  Serial.println("initialization done.");

  myFile = SD.open("test.txt", FILE_WRITE);
  if (myFile) {
    Serial.print("Writing to test.txt...");
    myFile.println("testing 1, 2, 3.");
    myFile.close();
    Serial.println("done.");
  } else {
    Serial.println("error opening test.txt");
  }

}

void loop()
{
	// nothing happens after setup
}
Lire des données depuis une carte SD
Matériel
- Arduino Uno
- Adafruit Data Logging Shield
- Une carte SD formaté en fat32
Principe
Le but est de monter comment lire des informations d'un fichier sur la carte SD.
Programme
Voici le programme qu'il faut éditer dans l'IDE Arduino, puis compiler et charger dans la carte Arduino.
/*
  Ce programme montre comment écrire sur une SD Carte
 * SD card attached to SPI bus as follows:
 ** MOSI - pin 11
 ** MISO - pin 12
 ** CLK - pin 13
 ** CS - pin 4

 */

#include <SD.h>
#include <SPI.h>

File myFile;
void setup()
{
  // Open serial communications and wait for port to open:
  Serial.begin(9600);
  while (!Serial) {
    ; // wait for serial port to connect. Needed for Leonardo only
  }


  Serial.print("Initializing SD card...");
  // On the Ethernet Shield, CS is pin 4. It's set as an output by default.
  // Note that even if it's not used as the CS pin, the hardware SS pin
  // (10 on most Arduino boards, 53 on the Mega) must be left as an output
  // or the SD library functions will not work.
  pinMode(10, OUTPUT);

  if (!SD.begin(4)) {
    Serial.println("initialization failed!");
    return;
  }
  Serial.println("initialization done.");

  // open the file. note that only one file can be open at a time,
  // so you have to close this one before opening another.
  myFile = SD.open("test.txt");

 // open the file for reading:
  myFile = SD.open("test.txt");
  if (myFile) {
    Serial.println("test.txt:");

    // read from the file until there's nothing else in it:
    while (myFile.available()) {
      Serial.write(myFile.read());
    }
    // close the file:
    myFile.close();
  } else {
    // if the file didn't open, print an error:
    Serial.println("error opening test.txt");
  }
}

void loop()
{
	// nothing happens after setup
}
Ecrire à intervalle régulier les données d'un capteur de température/humidité
Matériel
- Arduino Uno
- Shield datalogger
- Carte SD formatée en FAT 16/32
- Plaque d'essai (breadbord)
- Capteur DHT11 ou DHT22
- Résistance 4,7kΩ 1/4W (si besoin)
- Straps ou fils de liaison
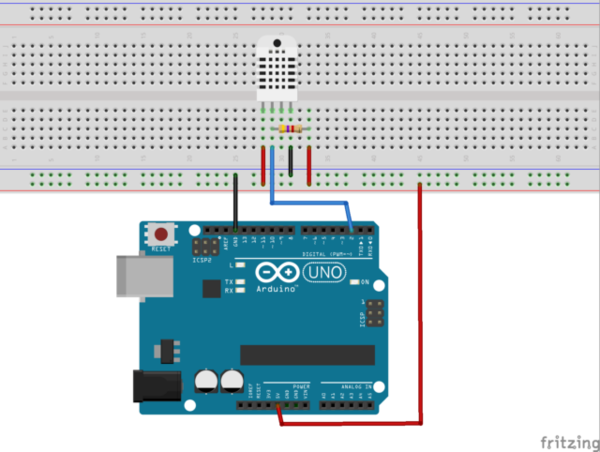
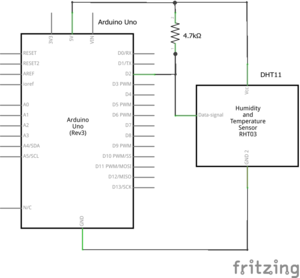
Montage
Programme
Voici le programme qu'il faut éditer dans l'IDE Arduino, puis compiler et charger dans la carte Arduino. Il utilise une librairie.
Pour télécharger la librairie : DHT11
La librairie SD pour écrire sur la carte est nativement fournie par l'IDE.
#include <dht11.h>
#include <SD.h>
#include <SPI.h>

dht11 DHT11;
File myFile;
long iteration;

#define DHT11PIN 2

void setup()
{
  Serial.begin(9600);
  Serial.print("Initializing SD card...");
  // On the Ethernet Shield, CS is pin 4. It's set as an output by default.
  // Note that even if it's not used as the CS pin, the hardware SS pin
  // (10 on most Arduino boards, 53 on the Mega) must be left as an output
  // or the SD library functions will not work.
   pinMode(10, OUTPUT);

  if (!SD.begin(4)) {
    Serial.println("initialization failed!");
    return;
  }
  Serial.println("initialization done.");
  myFile = SD.open("sensors.csv", FILE_WRITE);
  if (myFile) {
    Serial.print("Writing to sensors.csv...");
    myFile.println("loop;humidity,temperature");
    myFile.close();
    Serial.println("done.");
  } else {
    Serial.println("error opening sensors.csv");
  }

  Serial.println("DHT11 Humidity and Temperature Digital Sensor sketch");
  delay(1000);          // wait for sensor initialization

  // loop
  iteration = 1;
}

void loop()
{
  uint8_t chk = DHT11.read(DHT11PIN);

  Serial.print("Sensor status: ");
  switch (chk)
  {
    case 0:  Serial.println("OK"); break;
    case -1: Serial.println("Checksum error"); break;
    case -2: Serial.println("Time out error"); break;
    case -3: Serial.println("The sensor is busy"); break;
    default: Serial.println("Unknown error"); break;
  }

  Serial.print("Humidity (%): ");
  Serial.println(DHT11.humidity, DEC);

  Serial.print("Temperature (C): ");
  Serial.println(DHT11.temperature, DEC);

  myFile = SD.open("sensors.csv", FILE_WRITE);
  if (myFile) {
    Serial.print("Writing data from sensors to sensors.csv...");
    String sIteration = String(iteration);
    String sHumidity = String(DHT11.humidity);
    String sTemperature = String(DHT11.temperature);
    myFile.println(sIteration + ";" + sHumidity + ";" + sTemperature);
    myFile.close();
    Serial.println("done.");
  } else {
    Serial.println("error opening sensors.csv");
  }

  iteration++;
  delay(2000);
}

